As you can probably figure from the title, the blog you are currently laying eyes upon (as of November 24, 2019 anyway) is brought to you via a sweet sweet combo of GatsbyJS and Github Pages, and you can now visit it via a domain registered via Name.com.
Overall I’m very excited about how things turned out! Though I did get tripped up by a few things during setup. If you’re interested in using this stack to create a static site, hopefully this post will help you dodge the pitfalls that I wholeheartedly launched myself into. Or, if you are here because you are already in a pitfall, then hopefully I can help troubleshoot you out of there.
How do I get setup?
- Install the Gatsby CLI tool.
npm install -g gatsby-cli
-
Find a starter template for your blog, or use the gatsby-starter-blog template if you want something more bare-bones that you can style at will.
-
Now setup your blog locally via CLI.
gatsby new my-blog-name https://github.com/YOUR/TEMPLATE
-
After intial setup, chances are you’ll want to update the
package.jsonwith updated author & repo information as well. -
At this point, you can get cracking with development or just get started with writing posts!
cd my-blog-name
gatsby develop
Alright, I’m ready to deploy. Now what?
Here’s where things get a bit more complicated. First up, if you want to build & preview the production version of your blog you can do so via:
gatsby buildOr yarn or npm build, depending on the tooling you’re using. Once that’s done, you can serve your production build locally like so:
gatsby serveA note about RSS feeds! If you are using gatsby-plugin-feed to generate your feeds, note that it will only be generated after running the build process and can only be accessed via the production version of your site (
gatsby serve, then by defaultlocalhost:9000/rss.xml).
You cannot access your RSS feed when in local development mode (i.e.
localhost:8000/rss.xmlwill not resolve to anything).
Provided that everything looks as you expect, now it’s time to publish.
The GatsbyJS official documentation recommends using the gh-pages tool to deploy your apps to Github Pages. Depending on whether you are trying to deploy to a path or straight to a github.io subdomain, your deploy script will look something like this:
For paths
// package.json for paths
// Taken from the official docs
{
  "scripts": {
    "deploy": "gatsby build --prefix-paths && gh-pages -d public"
  }
}
// gatsby-config.js
module.exports = {
pathPrefix: "/reponame",
}For github.io subdomains
// package.json for .io subdomains
// Taken from the official docs

{
  "scripts": {
    "deploy": "gatsby build && gh-pages -d public -b master"
  }
}
Something to note about deploying to a subdomain—gatsby build will store the results in a build folder, but Github Pages expects any static content to be stored in root. Because of this setup, by default the branch that you develop in cannot also be the branch that Github Pages is sourcing from. Additionally, if you are using a github.io subdomain, you must source your content from master. So in my particular setup I keep my source code in a separate development branch.
Another big warning for you here, especially if you already have stuff in your master branch: the gh-pages command will force-push to master and blow away any files that were already in that branch. Granted you can always reverse this with some git magic, but this could cause some unnecessary stress if you’re not expecting it. You can configure gh-pages to be additive instead, but if you are sticking with the Gatsby ecosystem then there’s no real need to do so unless you have a use case for maintaining the old files in master.
If you don’t want to use a custom domain, then you’re done here! Your site is deployed and should be accessible via your pages URL.
Getting your app working with a custom domain
In order to get your Pages site working with a custom domain, you’ll need to do some configuration on the domain-side and then some on the Github-side. How you configure your domain depends on your provider, but overall it should be easy to find the steps with a quick search.
To configure the Github side of things, you’ll need to open up your repository settings (github.com/your-username/your-repo/settings) and fill in this section under Github Pages:
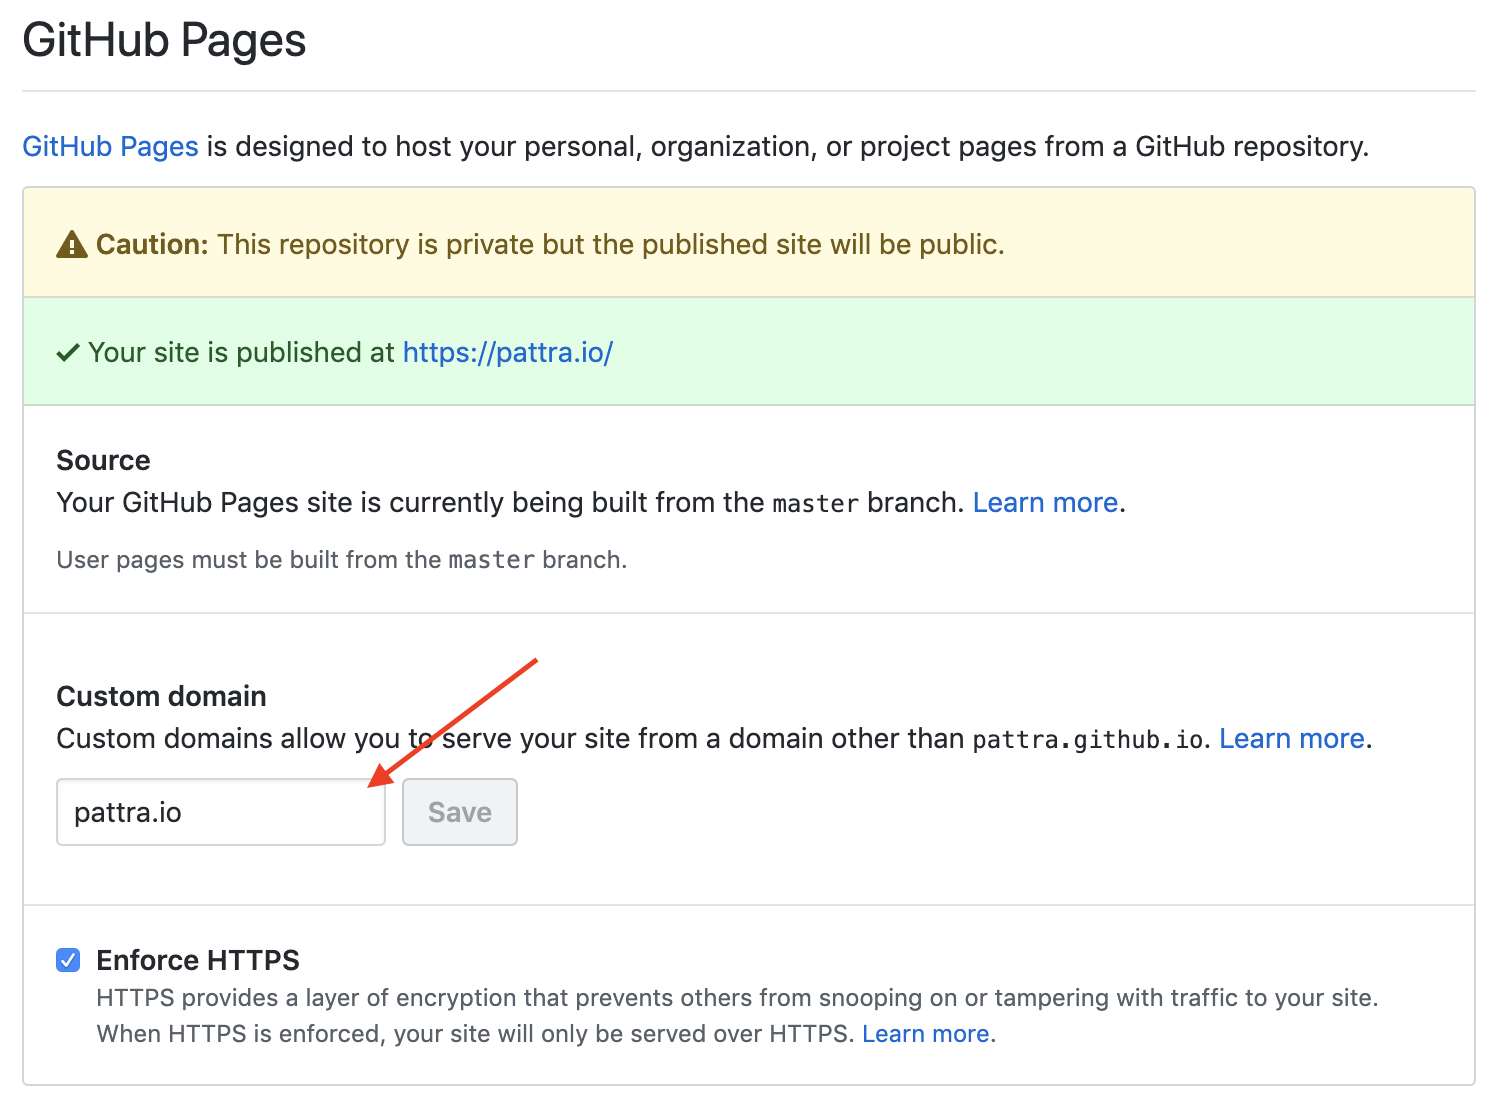
Fill in that box with the domain you want and click “Save.” After doing so, Github will automatically create an Update CNAME commit on your master branch. The CNAME file will look something like this:
your-domain.comWe’re almost done now. So above I mentioned the drama with how gh-pages force-pushes out of the box. The main reason why the force-push behavior sucks is that it will delete your CNAME file every time you deploy. Going into Github repo settings after every deploy in order to update the custom domain, re-enforce HTTPS, and deal with the certificate circus over and over again is not a good look. Luckily, we can get around this.
In the branch that you do development work in (i.e. the branch w/ the source code for your Gatsby app), add the following two files to the static folder:
.nojekyll
CNAME
The contents of your CNAME file should just be your domain. So in my case, it looks like this:
pattra.ioThe .nojekyll file should be empty. Then, update your package.json:
// package.json
{
  "scripts": {
    "deploy": "gatsby build && gh-pages -t -d public -b master"
  }
}
So, what did we just do here? Basically, any file that you store in the static/ folder in source will be copied into the root of your production app at build time. So now, instead of blowing away our CNAME every deploy and breaking all our old links, our domain config settings are maintained and we don’t have to touch our Pages configs again! 🎉
Secondly, we are adding a .nojekyll file to tell GitHub that our app is… not using Jekyll. GitHub Pages will run various automated checks on your builds under the assumption that it’s a Jekyll app, and sometimes this can cause issues for us Gatsby folks. The .nojekyll file will tell GitHub to stop doing those checks; the -t flag in our deploy script is because by default gh-pages will ignore files with a . prefix in the static folder. -t will let us copy over the files.
Commit & push your changes to your development branch, re-deploy, and… voila! You now have a working Gatsby site, hosted via GitHub Pages, and it is accessible via your very own domain.
Now let us blog off into the sunset, and pray that we never have to fiddle with our configurations ever again. 🙂